june 2-2.jpg
Posts in home
Minimalist Neutral Nursery

We are nearing the end of my pregnancy, currently writing this at 37 weeks — EEK! There are so many emotions, but excitement is definitely at the centre. I thought it’d be a good time to finally reveal our minimalist, neutral nursery. If you’re a parent out there, you probably learned early on just how expensive baby things are. My husband and I definitely had some major sticker shock when we initially began purchasing things for our baby. You’ll notice a lot of IKEA, some DIYs, and Facebook Marketplace. We received a lot of things secondhand from friends and family and for higher ticket items, we were able to score some great deals on Marketplace.

Room Updates

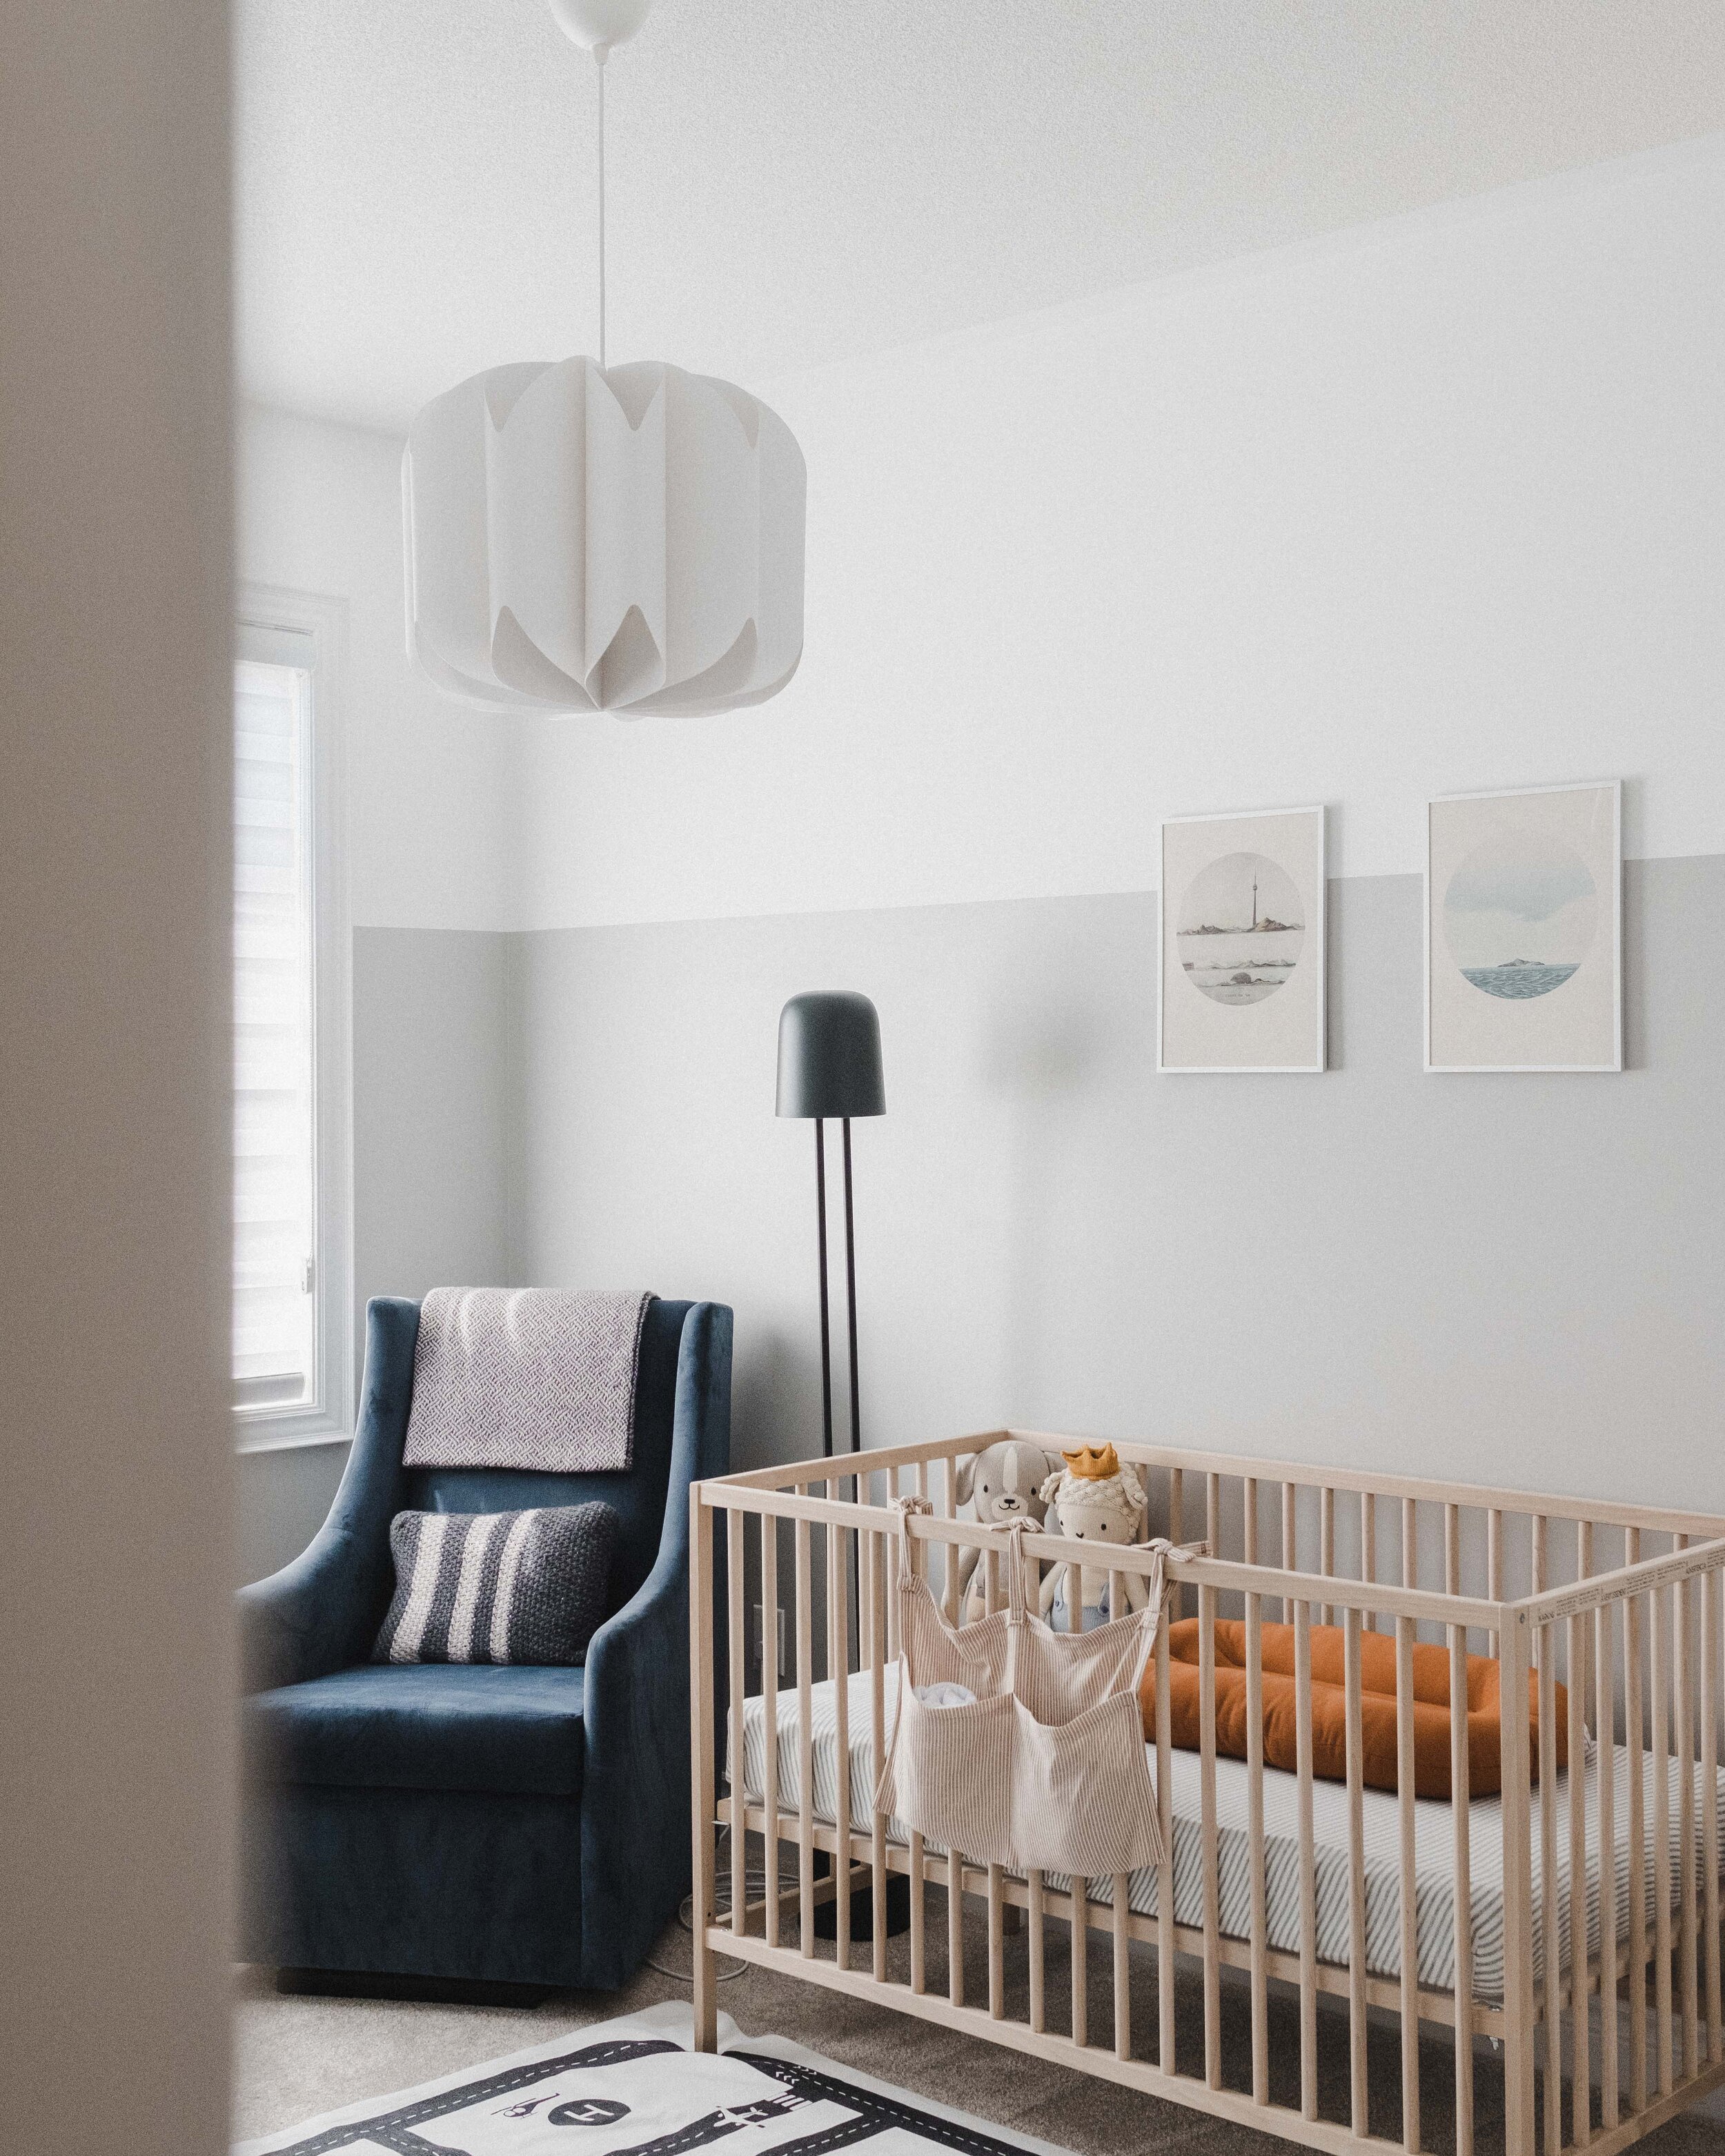
We recently moved into this home so this room had been designated storage for a long time. When we found out that we were expecting, it just made sense that this room would be the nursery. Although we love a good DIY, we are not the most experienced, so we juggled between creating a board and batten wall and doing this two-toned paint wall. We eventually settled on this two-toned wall because we thought it would be simpler to execute, yet still give us that clean, modern aesthetic we were hoping for. We just knew we needed to get rid of the creamy builder’s paint. Though not perfect, we’re really pleased with how the walls turned out!

We swapped out the classic cake light for the MOJNA, a cute recycled plastic pendant from IKEA which really adds a nice moodiness to the room. Changing out light fixtures makes the biggest difference in a room! We also put in a standing lamp that was kindly gifted to me by Gantri (“CMTAY20” for $20 off), a company that makes 3D-printed lights out of sustainable materials. I think this will be perfect for those late night feeds.

Large Furniture Pieces

For the larger furniture pieces, like the crib, changing table, and rocking chair, we debated a long time to find the right pieces for this room. In the end, we stuck with the classic wooden IKEA SNIGLAR crib and the TARVA 6-drawer chest which doubles as a changing table. We were stuck in lockdown for the majority of months that we spent putting this room together, so I decided to do a little DIY upgrade on the dresser. I used some leftover paint that my sister had lying around and gave this dresser a nice facelift. I liked the look of the natural wooden tones, so I left the legs and knobs plain. The rocking chair was the last piece that we put into the room because we weren’t sure if we were going to need it. To be honest, we still don’t know as we get a lot of mixed opinions on rocking chairs, but we scored this West Elm rocker for $200 bucks on Facebook Marketplace!

On the Walls

I’ve had these State Goods prints lying around the home for a while, and finally found the perfect place to put them up! I love how muted the colours are and that they don’t outwardly scream “baby nursery”. I think the clear acrylic shelves added the perfect finishing touch to this room for practical storage for books and other cute stuffies.

The finishing touches

On the front of the crib, I sewed this fabric crib caddy with excess material I had at home. The cutest Cuddle + Kind dolls sit inside baby’s crib, along with a neutral-toned cribsheet from Solly Baby, and a Snuggle Me Organic Lounger that my sister and brother-in-law gifted to us.

Let me know your thoughts on this nursery. We tried to keep everything as minimal and neutral as possible! I’m really happy with how everything turned out and now we wait for bub’s arrival! If you'd like to see the raw, behind-the-scenes progress of how we brought this room to life, check out the nursery vlog below.


This post is not sponsored but may contain some gifted items and affiliate links. If you decide to shop through the links above, I may make a small commission that helps support this blog and other social platforms. I only share products and brands I love and support. All opinions are my own.

Thank you for supporting Candice Tay!

Tips to Help You Save Water in the Kitchen In Partnership with Finish Canada

Tips to Help You Save Water in the Kitchen

In Partnership with Finish Canada

Today I’m partnering with Finish Canada to share a few quick tips to save water in the kitchen, helping you live a little more sustainably. Canada is home to 20% of the world’s freshwater resources and 35% of Canada’s water is renewable. However, there are many places where the abundance of water and water quality is threatened. I’m excited to share that Finish is partnering with the Nature Conservancy of Canada to help preserve Canada’s freshwater supply. Together through this campaign, we’re hoping to help Canadians and people across the world implement small changes to make a big impact. If you’ve been around my blog for a while, you’ll know that I’m all about taking small, simple steps to living more simply and sustainably.

Alright, let’s get into the tips!


Partnership Disclosure: This post is sponsored by Finish Canada and some items listed below were gifted as part of this partnership. I earn a small commission (at no additional cost to you) on sales made through the Amazon storefront link which helps to support this blog as well as my other social channels. As always, thanks for your continued support!


Soak, don’t rinse

The first tip is to soak your produce instead of rinsing it under the tap. This helps to save water because instead of keeping the tap running using both energy and water, you can sufficiently clean your produce in one large bowl of water. This tip also goes for stubborn pots or dishes. Instead of running the tap to clean these dishes, let them have a good soak and the food should come off easily.

Use a vacuum flask

This tip is especially useful during the fall and winter seasons. JT and I turn on the kettle in the morning to start our days with a cup of coffee. We then pour the remaining hot water into a vacuum sealed flask so that throughout the day we have access to hot water whenever we need it. This saves energy and water because you don’t need to turn on the kettle for a new pot of water each time you want a hot cup of tea or a hot drink.

skiptherinse-1.jpg

Try waterless cookware

I’m just learning about waterless cookware now and am quite impressed by how it works. These pots don’t look drastically different than your regular every day pots, but they are supposed to help save energy and water while helping you make delicious, healthy meals. After a little bit of research on my own, the thing that makes waterless cookware unique is that it is consists of three layers. The main outer layer is usually made of stainless steel, while the heating surface of the pot is often copper or aluminum. The middle of the pot is usually made of iron. I found that the pots heated up significantly faster than my usual ceramic or cast iron pots and pans. This in turn helps to save not only energy, but also time. When cooking with waterless cookware, you’re supposed to allow the steam to help cook your food which reduces the amount of water you need to use when cooking. Check out my YouTube video to see the little experiment we did with our veggies.

skiptherinse-2.jpg

Reuse water when cooking

When you’re in the kitchen preparing meals, try to reuse water where possible. For example, when you’re making pasta, save some pasta water to be added to the sauce instead of turning on the tap for water. If you like to boil your veggies, save that water to make your own veggie broth with any vegetable scraps you’ve saved up.

Use appropriately sized pots

My final tip is simple! Whenever you’re cooking, choose an appropriately sized pot for whatever you are making. Specifically, when boiling, select a pot that will have just enough water to cover your food.

Don’t pre-rinse your dishes

Opt to use the dishwasher when you can, but make sure it’s a FULL load. This will help save a ton of water and is a lot more energy-efficient. Don’t forget, that when you use the dishwasher, you don’t need to pre-rinse your dishes. Simply scrape off the larger chunks of food and let the dishwasher do its job.

More sustainable kitchen swaps

I also wanted to mention a few of my favourite sustainable swaps specifically for the kitchen. You’ve most likely heard me mention these, but if you haven’t given these a try, I highly recommend making these simple changes. These are all swaps that I’ve been using for over two years and haven’t looked back.

Beeswax Wraps

Beeswax wraps are probably my favourite kitchen swap because they are SO useful and effective. They are the perfect alternative for cling wrap and help reduce food waste and keep your food lasting longer in the fridge.

Swedish Dish Cloths

I honestly can’t get enough of these dish cloths. Swedish dish cloths are made of cellulose plant fibre so they are not only super absorbent, they are also compostable at the end of its life. I use Swedish dish cloths or old rags to wipe up spills on my counters and table top surfaces. You might not be at the point where you can cut out paper towels completely, but these are a great swap to at least help you reduce the amount of paper towel that is used in your household.

skiptherinse-4.jpg

Reusable Straws

Reusable straws are probably the most accessible swap you can make these days. They also come in various materials like glass, silicone, stainless steel, and bamboo, so you can choose what you prefer and what best fits your lifestyle.

There are so many more swaps I could mention, I’ll leave a link to my eco-friendly storefront so you can shop some of these swaps when you’re ready to make the change.

I hope these tips were helpful and inspiring. It’s all about taking small steps to make big changes. These tips will not only help you save water but will also help you save energy and money in the long run. I’ve also filmed a new vlog over on my YouTube channel walking you through some more simple sustainability tips while putting Finish’s Quantum Ultimate dishwashing pods to the test. If you can’t get enough of these water-saving tips or want to learn more about Finish’s commitment to water conservation, head over to www.skiptherinse.ca to learn more.

Earth Week Tips: Part III
earth month-15.jpg

Earth Week Tips: Sustainability While Social Distancing

Part III: Sustainability At Home

Originally this last post was going to be about sustainability while on-the-go, but while we’re all staying in, I thought it’d be best to pivot a bit and write about ways to celebrate Earth Week from the comfort of our homes while still being sustainable.

Get Comfy!

Whether you’re working from home or just staying in like me, let’s tackle these days in our best and favourite comfies. Whatever that might look like for you, here are some of my favourite sustainable brands for comfy, loungewear outfits. 

earth month-13.jpg

And hey, if you don’t want to wear loungewear and want to get dressed up each day, you go ahead and do that! I did a fun fashion challenge last week that got me into my regular clothes again and having fun with some of my favourite outfits.

Here’s a recent video I made sharing 5 Work From Home Outfits!

Get Moving!

It’s important during this time to keep our bodies active and also if you can, go outside and enjoy the weather and beautiful nature in your own backyard. 

If you’re looking for sustainable activewear, I’ve written a whole review showcasing a few different sustainable brands in this post.

Declutter!

If you’ve been following me on Instagram or on YouTube, you probably know how much decluttering and reorganizing I’ve done around the house as a result of being at home. This is a great time to go through your things and evaluate what kind of things are lying around your home. If this seems like a daunting task, don’t tackle it all at once, maybe just declutter a drawer a day. Remember when you’re decluttering, to declutter sustainably! This could be an entire post on its own, but simply remember these 2 things:

  • If an item can still be used, try to find a second home for it or repurpose it

  • If an item is at the end of its life, dispose of, recycle it, or compost it properly

Reorganize!

Once you’ve decluttered, reorganizing things is a fun, sustainable way to give your space a whole new feel without spending a dime. Re-jig your furniture to update your space, reorganize a drawer or cabinet to make things easier to find or more aesthetically pleasing, or simply find a new organization system so your things all have a home.

earth month-12.jpg

Unplug!

While we’re at home, there’s probably a lot of devices being used. A little tip is to unplug your devices when you’re done with them at the end of the day or if they’re on a charging cord, simply switch that off to save energy. Constantly being on our devices can also be extremely exhausting, so try to find time to mentally “unplug”. Read a book, journal, enjoy a moment of stillness. Whatever it is, enjoy and treasure the time we have now to slow down.

Try something new!

Since we’re staying at home, this is a great time to try something new. Whether that be a new hobby, or taking an online course you’ve always wanted to tackle, or implementing a new personal habit. I personally think it’s the perfect time to tackle a new sustainable habit!

Here are a few sustainable habits you can try today!

  • Try not washing your hair! — I mean you’re at home, now is the perfect time to try this!

  • Try a menstrual cup! — Staying in is the perfect time to give menstrual cups a go!

  • Try to eat less meat! — Now is a great time to get creative with your cooking and test out some new veggie recipes to cut down on meat consumption

  • Try some at-home DIY projects — My personal favs are DIY body butter, DIY all-purpose cleaner, DIY cotton rounds)


This post is not sponsored but may contain some gifted items and affiliate links. If you decide to shop through the links above, I may make a small commission that helps support this blog and my Instagram. I only share products and brands I love and support. All opinions are my own. Thank you for supporting Candice Tay!